Version: OpendTect 6.0
This entry explains how to use OpendTect to track horizons in faulted areas by working in vertical sections.
We will assume that the work area is small, there are only a few faults and these can be identified as individuals allowing named faults to be used from the outset.
Here is the workflow for a region of interest (ROI):
- Identify fault block and horizon of to be mapped
- Identify faults that bound your fault block
- Scan through ROI on inlines (IL) and cross lines (XL) and determine which gives best view of horizon and faults in ROI. We assume you will work on IL sections here.
- On the project tree create a pickset and place a pick on your horizon and its correlation across faults that bound your block. Note what IL the picks are on
- Create horizon and set appropriate tracking parameters
- Create all faults you will need, naming them logically (e.g., F1, F2, F3, etc)
- Go to the IL that gives the best view of your faults and horizon correlation across them
- Set IL jump to 20, 10 or 5 depending on size of area and complexity of structure
- Select horizon from project tree and place seeds at each end of each fault block as close to the fault location as possible
- Select F1 from project tree and place picks. Be as consistent as possible on picking shallowest and deepest fault point on each IL
- Same for F2, F3, etc.
- Jump to next IL location, make horizon and faults only visible at sections (hotkey v) and repeat steps 7-2 through 7-4
- Go to Z-North view
- Hide all faults
- Make horizon visible in full (hotkey v), you should see all the seeds you picked.
- From the tracking parameter window, select Retrack All. This forces tracking from all seed points simultaneously.
- Assuming you have the entire data set preloaded, watch until your horizon tracking progresses beyond your ROI, then hit the red Stop Auto Tracking button on the tracking parameter window.
- Review the time structure map for jumps that indicate tracking busts inside fault blocks. We expect time structure jumps at faults.
- If there are tracking busts
- Repeat step 7 in the bust area with a smaller IL jump interval
- Repeat step 8
- Repeat step 9
- If there are no tracking busts
- Make faults visible (hotkey v)
- Select horizon on project tree and use polygon/rectangle tool to trim tracked area to ROI
- Make contours, show amplitude, etc for final display
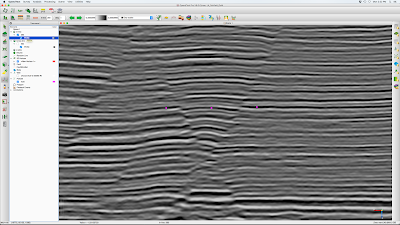 |
| Figure 1. Vertical seismic IL section with pickset points identifying horizon to be mapped |
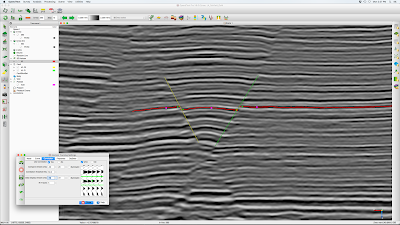 |
| Figure 2. Same IL after defining horizon and faults, then picking them in this line |
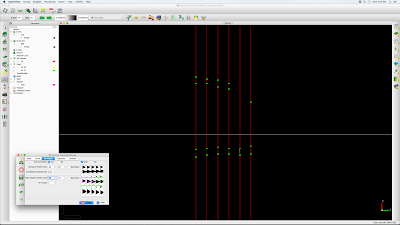 |
| Figure 3. Map view of horizon seeds (green) and traced ILs (red) |
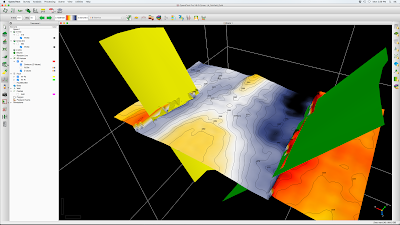 |
| Figure 4. Final after auto tracking, trimming to region of interest, adding time structure contours and 3D display with faults |


